Solo: Dahlgaard’s Heir
Setup and play against the Heir, with or without the Academy board.
Overview
Play your human Magician against Dahlgaard’s Heir, an automated opponent. Solo uses the Dark Alley. The main solo rules use the Academy; the published variant without Academy uses the other side of the Heir board and its alternative Plan cards.
Magician Powers and Duel of Magicians Turn Setup cards are excluded. Solo and Duel Performance cards may be freely mixed. Dawn of Technology and Arcane Arts have their own Heir adjustments.
Setup
Use a two-player game with the Heir in the other player’s place. Follow the interactive checklist, enabling Academy if you are using its board and rules.
Your human Magician
Use the normal core player package and starting Specialist. With Academy, add your Protégé and other Academy player pieces. You are first in Initiative Order. Start with 12  and 3
 with Academy, or 10 Coins and 5 Fame without it. A starting Trick is Prepared with its printed marker quantity if your initial Components meet its requirements.
The Heir
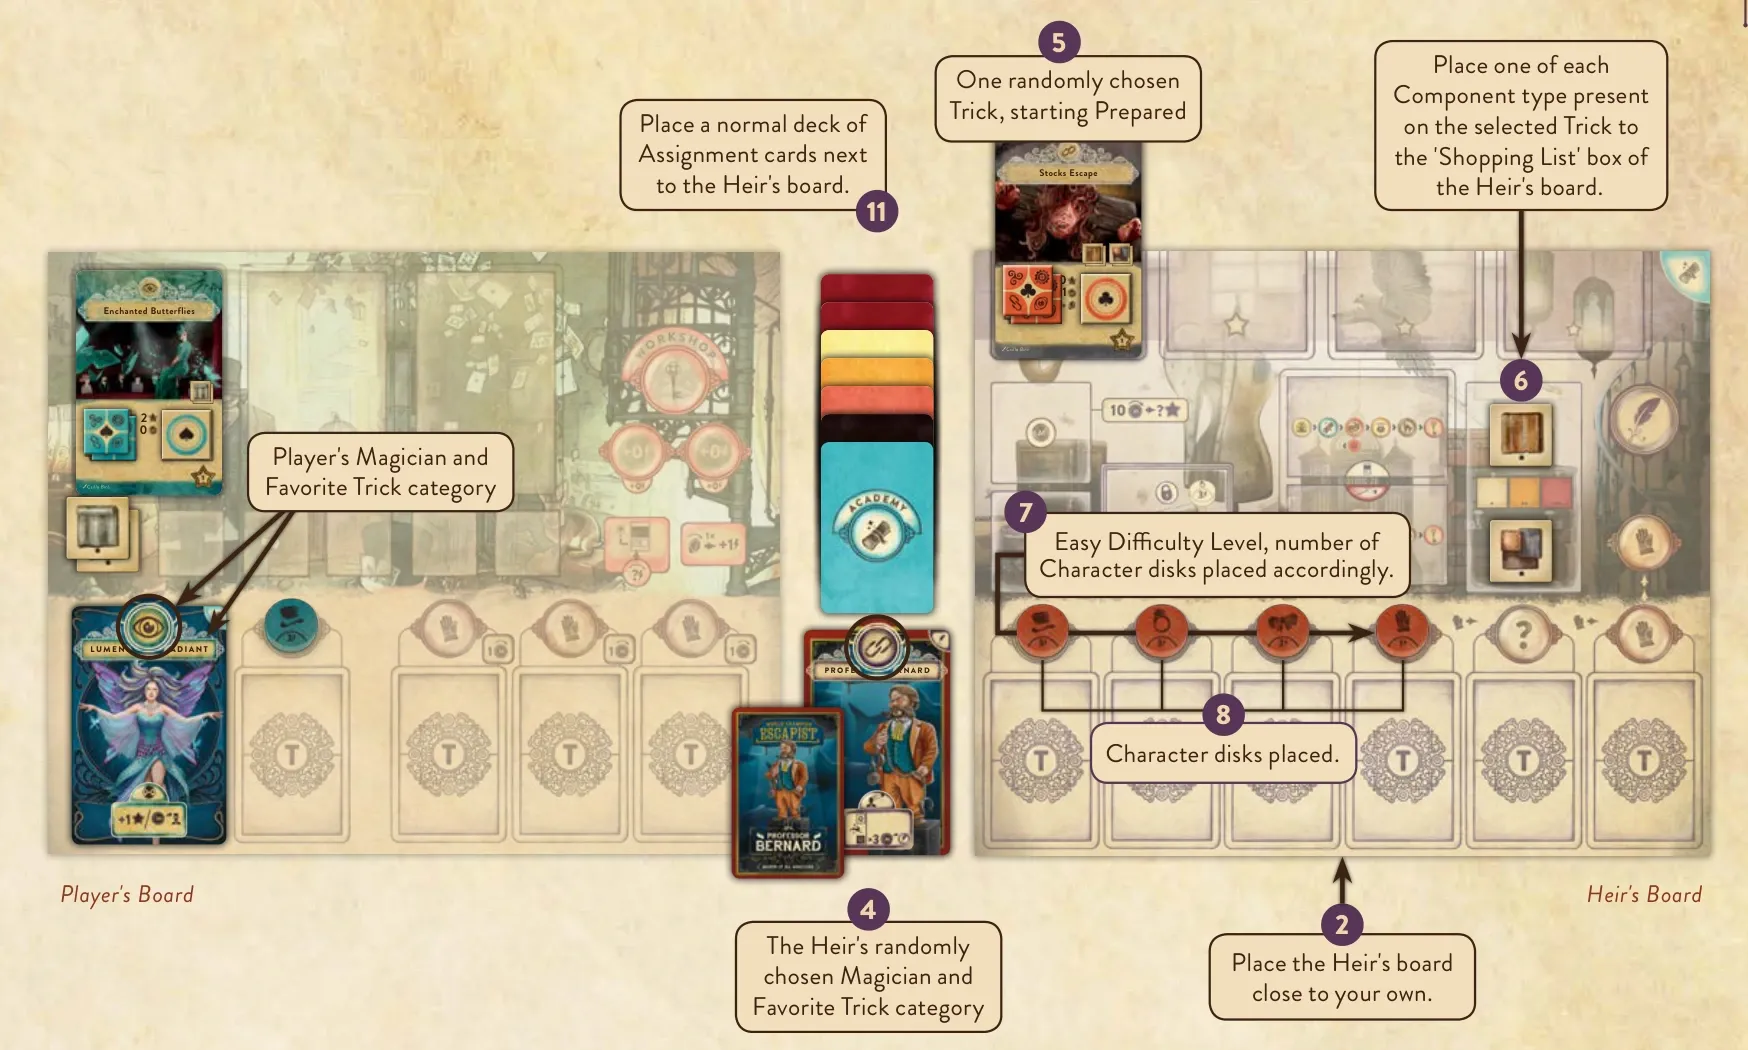
- With Academy, use the Heir board’s six-Character side. It needs no Magician board or board extensions.
- After choosing your Magician, remove all other Magicians of your Favorite category from the selection. Shuffle the remaining Magicians and give the Heir one at random, using its solo-ability side.
- Shuffle the three Level 1 Tricks of that Favorite category other than the first Trick that requires two Basic Components. Give the Heir one at random, in its leftmost Trick slot, Prepared with its printed number of markers. Return the other two to Dahlgaard’s Residence.
- Put one of each required Component type in the Heir’s Shopping List.
- Choose a difficulty and take its Characters from the table below. Arrange them left to right: Magician → Protégé → Specialist(s) → Apprentice(s). Specialist types are interchangeable for the Heir.
- The Heir starts with no Coins or Shards. Its starting Fame follows the chosen core/Academy setup.
- Put its standard Assignment supply beside the board: two Theater, one Downtown, one Academy, one Market Row, one Dark Alley and one Workshop.
- Build its Plan deck and remove the excluded Prophecies before completing setup.
Publisher markers: 2 Heir board; 4 random Magician; 5 starting Trick; 6 Shopping List; 7 difficulty; 8 Character order; 11 Assignments. The illustration shows Academy on Easy difficulty.
| Difficulty | Heir starting Characters with Academy |
|---|---|
| Easy | 1 Magician, 1 Protégé, 1 Specialist, 1 Apprentice |
| Normal | 1 Magician, 1 Protégé, 1 Specialist, 2 Apprentices |
| Hard | 1 Magician, 1 Protégé, 2 Specialists, 1 Apprentice |
Build the Plan deck
Use the nine-card Academy Plan family, or the eight-card family without Academy. A Perform card has icons at both top and bottom; a Set Up card has icons only at the top. Build the deck bottom to top, keeping cards face down:
- Choose one Perform card at random as the bottom card.
- Shuffle one Set Up and two Perform cards. Put two on the deck and remove the other without looking.
- Shuffle two Set Up and one Perform card and put all three on the deck.
- With Academy: put one of the two remaining Set Up cards on top and remove the other without looking. Without Academy: put the single remaining Set Up card on top.
The finished deck has seven cards in either mode. Do not shuffle the completed deck: its sequence is deliberate.
Turn Setup dice
After rolling the Downtown dice:
- Turn I: roll all five Turn Setup dice: Downtown, Market Row, Dark Alley, Academy and Theater. Use each layout to block two Character slots at its Location, or two Theater weekdays. Without Academy, exclude the blue die.
- Turn II: choose exactly two dice to reroll, then put the two Turn Setup markers underneath them.
- Turns III–VII: choose exactly two dice without markers to reroll. If the Theater die has no marker, one of your choices must be Theater. Move the markers under the two dice just rerolled and adjust the blocked spaces.
The Heir’s turn
Assign your Characters first, face up. Then reveal the next Plan card and assign the Heir’s Characters from left to right according to its icons. Ignore excess Characters or excess Location icons. Use a Special Assignment only where the Plan card specifies one; skip that Special Assignment Location if the Heir has no matching card.
The Heir is Ready only when the Plan card is a Perform card and it has at least one Trick of the highest Level available at its current Fame. Otherwise it is Busy. Slide the Plan card to the matching board slot. Re-evaluate stance immediately when its Fame crosses a threshold or it gains a Trick.
A Location is contested when both you and the Heir have an available Character assigned there but not yet placed. The normal Workshop is never contested. Theater is not contested if either player has only their Magician left assigned there. Secret Workshop has its own exception.
The Heir chooses a contested Location before any non-contested one. Within the applicable group, use this order:
- Ready Theater, preferring the earliest available day.
- Downtown.
- Academy.
- Busy Theater, preferring the latest available day.
- Market Row.
- Dark Alley.
- Workshop.
For Downtown, send assigned Characters left to right. For Theater, also go left to right, but place the Magician last. Re-evaluate contested Locations and stance for each placement.
Calculate AP normally, except that the Heir ignores Theater slot AP modifiers. It never spends Shards. Its Special Assignments add the usual +1 AP but their text is ignored. At six AP, resolve five AP and give it 1 Fame. Use the Location actions below.
Location actions
Use the Character’s AP  after slot modifiers. The Theater ignores its slot modifiers. At six AP, use the five-AP result and gain 1 Fame . The Heir never spends Shards; its Special Assignments add 1 AP and ignore their text.
Downtown
The table gives how many dice the Heir may take and turn to X:
| Difficulty | 1 AP | 2 AP | 3 AP | 4 AP | 5 AP |
|---|---|---|---|---|---|
| Easy | 1 | 1 | 1 | 2 | 2 |
| Normal | 1 | 1 | 1 | 2 | 3 |
| Hard | 1 | 1 | 2 | 3 | 3 |
If too few non-X dice remain, reroll one X die, choosing Trick → Specialist → Money → Apprentice. If it stays X, or more than one die is missing, accept fewer dice. Do not keep rerolling.
Work down this list until the allowance is used. After an action, continue below it; do not restart at the top.
- If the Heir has fewer than two Tricks of its highest available Level, or has at least 36 Fame, take a Trick die, leftmost if both qualify. Randomly choose a Trick of that Level and the die’s category; a question mark uses its Favorite category. When selecting Level 1, exclude the Trick requiring only one Basic Component type. If its Trick slots are full, return the rightmost Trick and remove its Symbol, Academy and Trick markers, including markers in the Theater. Sort the new Trick into descending Yield order: Fame first, then Shards, then Coins. Prepare it immediately. Add one of each required Component type to the Shopping List, omitting types already listed.
- Take a Specialist die if it shows a Specialist the Heir does not have. Put that Character beside the board for the End Turn phase.
- Take an available Apprentice die if it has fewer than four Apprentices and six or fewer Characters. Without Academy, this early limit is five Characters.
- Take the higher available Bank die and add its Coins to the Coin Purse.
- Take the other available Bank die and add its Coins.
- Take an available Apprentice die if it still has fewer than four Apprentices, without the early Character-count limit.
If no listed action remains possible, stop even with unused allowance. Newly hired Characters join during End Turn, rather than acting immediately.
Market Row
Remove Shopping List Components already present in the Market, including Quick Order. Randomly choose a remaining listed Component and put a copy from supply into the first empty Order slot, left to right and then top to bottom. Repeat up to one order per AP, stopping sooner if the Order area is full or every remaining listed type is already ordered. This orders Components; it does not purchase them or empty the Market.
Dark Alley
Flip a Coin to decide whether to rotate the Prophecies one step. Then draw Special Assignments using this table:
| Difficulty | 1 AP | 2 AP | 3 AP | 4 AP | 5 AP |
|---|---|---|---|---|---|
| Easy | 1 | 1 | 1 | 2 | 2 |
| Normal | 1 | 1 | 2 | 2 | 3 |
| Hard | 1 | 2 | 2 | 3 | 3 |
Choose the colour the Heir has fewest of, excluding cards currently assigned to Characters. Break ties Theater → Downtown → Academy → Market Row → Workshop.
Academy
The table gives the number of actions:
| Difficulty | 1 AP | 2 AP | 3 AP | 4 AP | 5 AP |
|---|---|---|---|---|---|
| Easy | 1 | 1 | 1 | 2 | 2 |
| Normal | 1 | 1 | 2 | 2 | 2 |
| Hard | 1 | 1 | 2 | 2 | 3 |
Follow these priorities once in order, spending one action when an eligible action is performed. Do not return to the top after each action.
- Secret: if it has fewer than two, flip a Coin to choose the top or bottom face-up Secret. Each Secret adds 1 AP to its Protégé; use the two-AP and then three-AP disk. Ignore the Secret’s printed ability.
- Renovate: do this if the Heir has no more Banners in the Academy than you, has a Banner left, and an open room space is empty. Only renovations whose threshold its Fame strictly exceeds are eligible. With 0–4 Coins in its purse choose the cheapest eligible renovation; with 5 or more Coins, choose the most expensive. Break cost ties in favour of Classrooms on odd turns or Practice Rooms on even turns, then top to bottom. Take a random room of the required level, score its Fame and place the turn’s normal number of Banners. Discard at most 9 Coins, ignoring the printed renovation cost.
- Classroom: choose the rightmost Trick not already in a Classroom or Practice Room. Put its Academy marker in an available Classroom on the tile with the highest threshold, taking the topmost available slot. The Heir gets no matching-Level placement bonus.
- Practice Room: choose the leftmost Trick not already in either room type. Use the available slot with the highest threshold, then top to bottom. Ignore slots that reduce Preparation AP or Component costs. A slot granting an additional Trick marker adds that marker immediately.
- Spare actions: alternate Classroom and Practice Room placement. If neither is possible, attempt Renovate as above even if the Heir has more Banners than you, then resume placements if actions remain. The remaining renovation conditions still apply.
On even turns, reverse the Classroom and Practice Room priorities, including their alternating order. Skip this Location entirely when playing without Academy.
Theater
Place the Magician in a Performance spot; it takes no other action here. A non-Magician ignores the Theater slot’s AP modifier and places up to this many Trick markers:
| Difficulty | 1 AP | 2 AP | 3 AP |
|---|---|---|---|
| Easy | 1 | 2 | 2 |
| Normal | 1 | 2 | 3 |
| Hard | 2 | 3 | 4 |
The 2019 solo rulebook gives Theater marker counts only for 1–3 AP (pp. 12 and 16). 4–5 AP results are not specified, so no values are extrapolated.
Take a legal combination of available markers from the Heir’s Tricks, working left to right. Skip a Trick that cannot be placed legally. For a marker’s destination prefer a Performance card with another Heir Trick, then a card with one of your Tricks, then the leftmost available card.
Choose positions and, when placing different Tricks together, their order to maximize Links. Take Fame for Link rewards; prefer a placement also earning a Shard. Break equal Fame/Shard placement ties topmost, then leftmost; equally rewarding orientations may be chosen freely. With no possible Link, use the first empty position left to right, then top to bottom.
The normal one-marker-per-Trick-per-card limit applies, except for the Practice Room ability allowing two copies. The Practice Room Link ability applies normally. Avoid a Performance card that will leave at End Turn unless it is the only available space; ignore that restriction in the final turn. Printed neutral grey Tricks can form Links but cannot be covered.
If sending a non-Magician would place zero Trick markers, leave that assignment for now and send a different Character. Check it again at later placements, since a newly learned Trick may make placement possible.
Workshop
A Character placed in the normal Workshop takes no action. The Secret Workshop promo has its separate solo rule.
Performance and End Turn
When the Heir performs, choose a Performance card containing one of its Tricks. Compare its Link bonus plus Performance-card bonus: most Fame, then most Shards, then most Coins, then leftmost. Replace normal Specialist backstage bonuses with:
| Difficulty | Bonus when the Heir performs |
|---|---|
| Easy | None |
| Normal | 2 Coins per backstage Character |
| Hard | 1 Fame per backstage Character |
Count every backstage Specialist, Protégé and Apprentice. Whenever either player performs a Heir Trick, the Heir gets its Yield, including Practice Room increases. Ignore Thursday/Sunday Yield modifiers and Prophecy Yield modifiers. Return performed markers immediately to the Heir’s Tricks, keeping them Prepared; the Practice Room ability that leaves a performed marker on its Performance card remains an exception.
During the Classroom phase it receives the full Yield of its teaching Tricks, ignoring slot modifiers. It does not remove Trick markers from its Tricks or the Theater for teaching. Without Academy, skip this phase.
The Heir pays no wages. Instead discard complete sets of 10 Coins from its Coin Purse, scoring 2 Fame on Easy or 3 Fame on Normal/Hard per set. Keep the remainder below 10. Newly hired Characters join now: Magician, Protégé, Specialists, Apprentices. Put Apprentices beyond the first six Characters in Additional Apprentices.
Heir Magician abilities
Use the Heir’s solo ability, rather than the multiplayer Magician Power. These panels identify the Heir abilities:
| Solo ability panel | Heir Magician and effect |
|---|---|
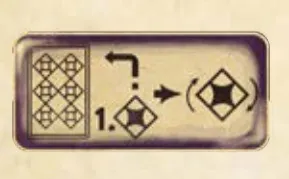 | Master of Chains: freely orient the first Trick marker the Heir places each turn; its category corner need not occupy a Link circle. |
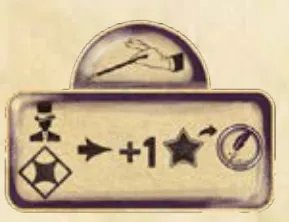 | Red Lotus: when the Heir performs, gain 1 extra Fame for each of your Tricks on that Performance card. |
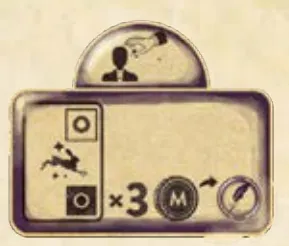 | Professor Bernard: in the Classroom phase, gain 3 Coins per Academy marker in Classrooms, counting both players. |
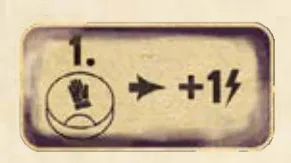 | The Mechaniker: the first Apprentice the Heir places each turn gains 1 AP. |
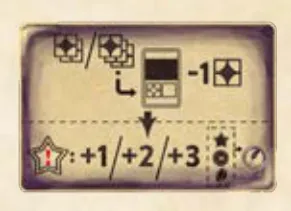 | Elektra: prepare its Tricks that normally have two or three markers with one fewer marker. Every Heir Trick gains extra Fame, Coins and Shards equal to its Level whenever its Yield is received. |
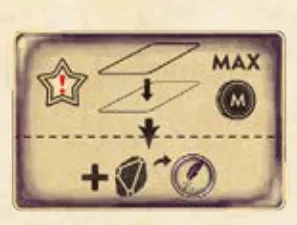 | Geert van Augustin: always choose the most expensive eligible renovation regardless of its Coin Purse, still strictly exceeding the Fame threshold. Gain 1 Shard each time it renovates. |
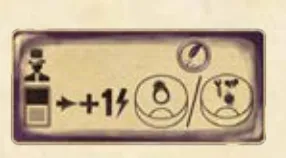 | The Great Optico: let X be the number of Special Assignments you used this turn. The first X Specialists or Protégés the Heir places this turn gain 1 AP each. |
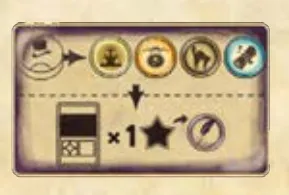 | Gentleman: when its Magician enters Downtown, Market Row, Dark Alley or Academy, gain Fame equal to its number of Trick cards. |
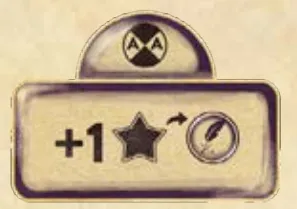 | Lumenia the Radiant: each Link the Heir creates while setting up Tricks in the Theater gives 1 additional Fame, without an additional Shard. |
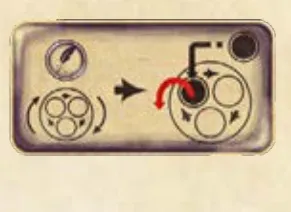 | Priestess of Mysticism: if the Heir rotates the Prophecies in Dark Alley, replace the next turn’s Prophecy with one drawn randomly. |
 | Yoruba Spiritmaster: the Heir performs first regardless of its Theater weekday. |
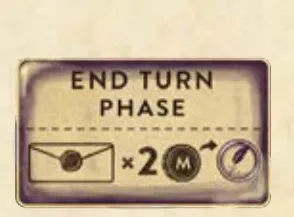 | Anjali: at the start of End Turn, before coin conversion in the Pay Wages step, gain 2 Coins per Secret its Protégé has. |
Without the Academy
Apply these changes to the normal solo rules:
- Use the five-Character side of the Heir board.
- Remove the Protégé from the difficulty’s starting Characters. Omit the Academy Assignment.
- Use the eight-card non-Academy Plan family and the composition above.
- Use four Turn Setup dice: exclude the blue Academy die.
- In the Downtown hiring priority, the early Apprentice check uses five or fewer Characters, replacing six or fewer. The later Apprentice check remains unchanged.
- Skip the Classroom phase.
The full Dark Alley game is still used. This is not the five-turn introductory variant.
Prophecies
Remove these four Prophecies before setup and before selecting the Pending Prophecies. Keep them out when preparing the chosen module’s pool:
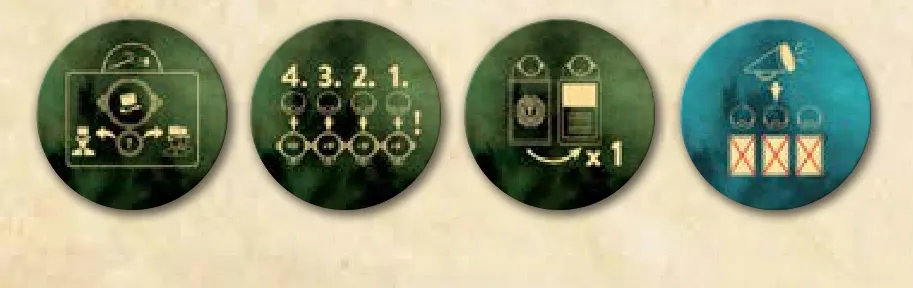
The following Prophecies affect only you; the Heir ignores their effects:
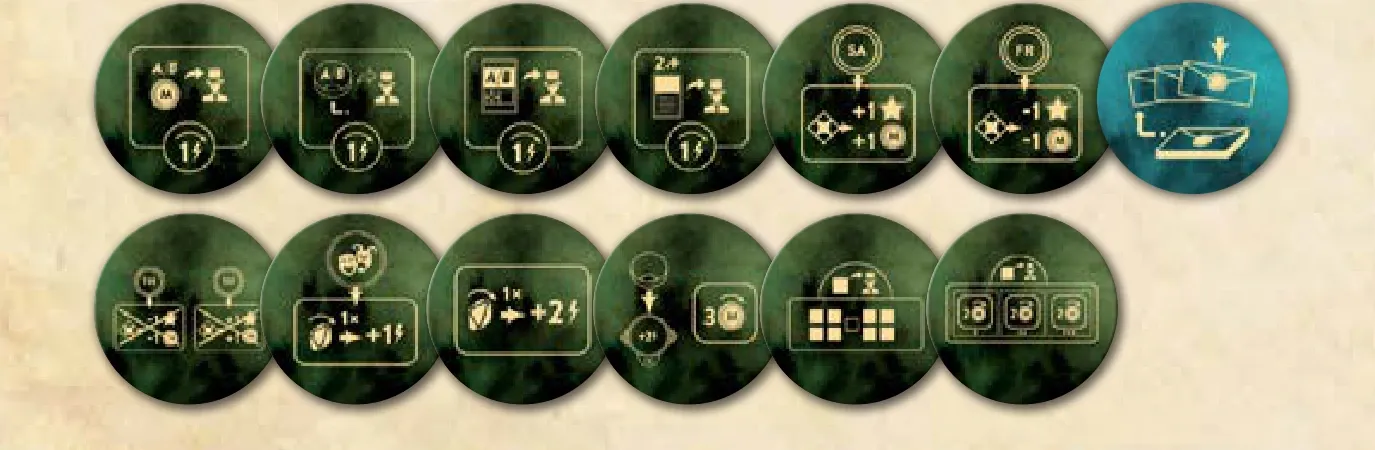
Academy Prophecy order
With Dahlgaard’s Academy, its setup removes seven Prophecies at random before adding the seven new Academy Prophecies and choosing the Pending Prophecies (Academy rulebook, p. 5). Against the Heir, the solo rules separately instruct you to remove four named Prophecies before setup and keep them out when preparing the Pending Prophecies (solo rulebook, p. 4).
Neither rulebook specifies how to order these removals when using both modules. Keep the four Heir exclusions out of the final pool, but do not treat either order for the seven random removals as an official combined procedure; agree on a house sequence before setup.
Solo scoring
[Arcane Arts] The Heir scores two Fame per leftover Arcane Shard, rather than its ordinary one Fame per Shard. Its Arcanist priorities and rewards also apply.
When a Performance card leaves the Theater, the Heir still receives its Tricks’ yields, reduced by 1 Coin and 1 Fame per Trick. At game end, apply the same reduction to its Tricks still on Performance cards.
It scores 1 Fame per Shard and 2 Fame per Special Assignment, capped at 20 Fame in each category. Leftover Coins do not score. Its Level 3 Tricks use the difficulty’s fixed value, and Characters beyond the first six add the bonus below:
| Difficulty | Fixed end-game bonuses |
|---|---|
| Easy | 5 Fame per Level 3 Trick; no bonus for additional Characters. |
| Normal | 7 Fame per Level 3 Trick; 1 Fame per Character above six. |
| Hard | 10 Fame per Level 3 Trick; 2 Fame per Character above six. |
Sources
Rules and illustrations: official solo rulebook, pp. 2–15; Dahlgaard’s Academy, pp. 4–6. Location priorities and phase exceptions follow the solo booklet, pp. 7–14.