Gameplay and Economy
Turn order, Action spaces, production, trade and mandatory Achievements.
A turn
Play clockwise. Each turn has three phases, in this order:
- Action: move your pawn and resolve its Action.
- Production: choose Population growth, Ore production or Resource trade.
- Achievement: claim one Achievement if eligible.
There is no fixed round count. The starting marker stays with its original owner so everyone receives equal turns when the end is triggered.
The boards
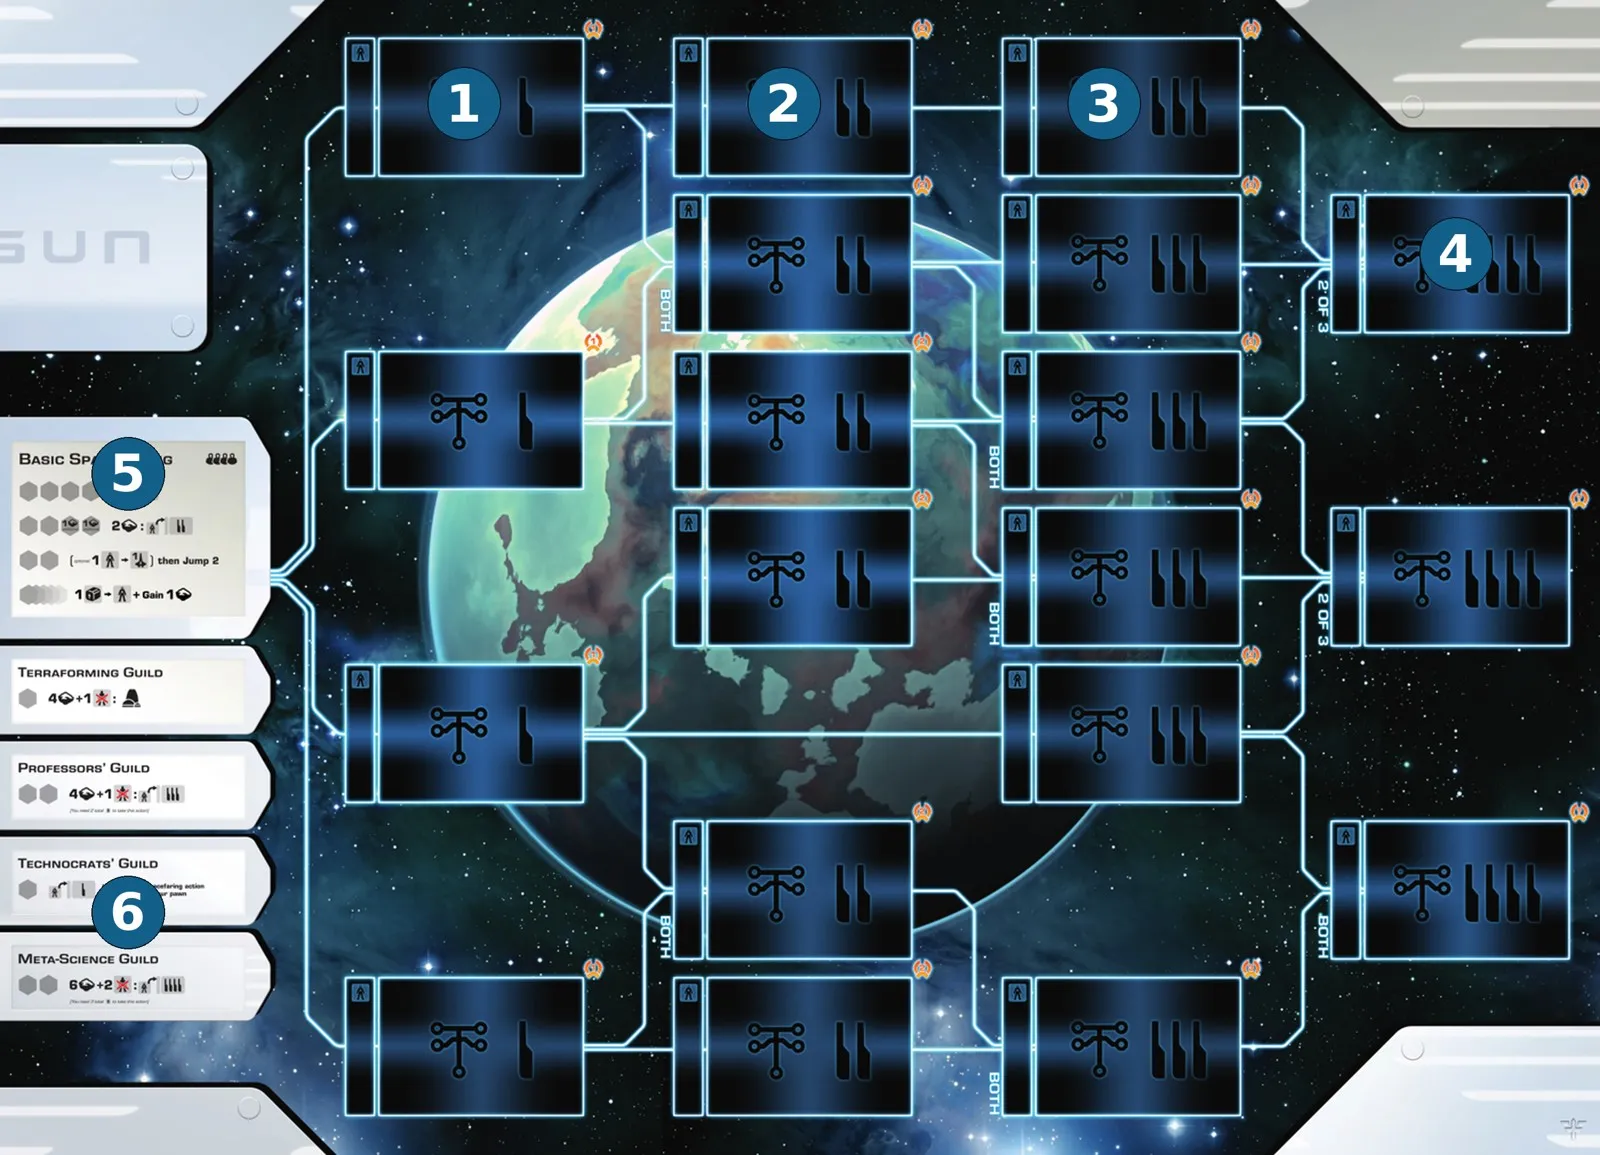
- Level I Technologies — the start of each research path.
- Level II Technologies — undiscovered slots begin under Events.
- Level III Technologies — more powerful research and Actions.
- Level IIII Technologies — printed end-game scoring.
- Basic Spacefaring — Actions available without research.
- Guilds — extra Actions unlocked by Events.
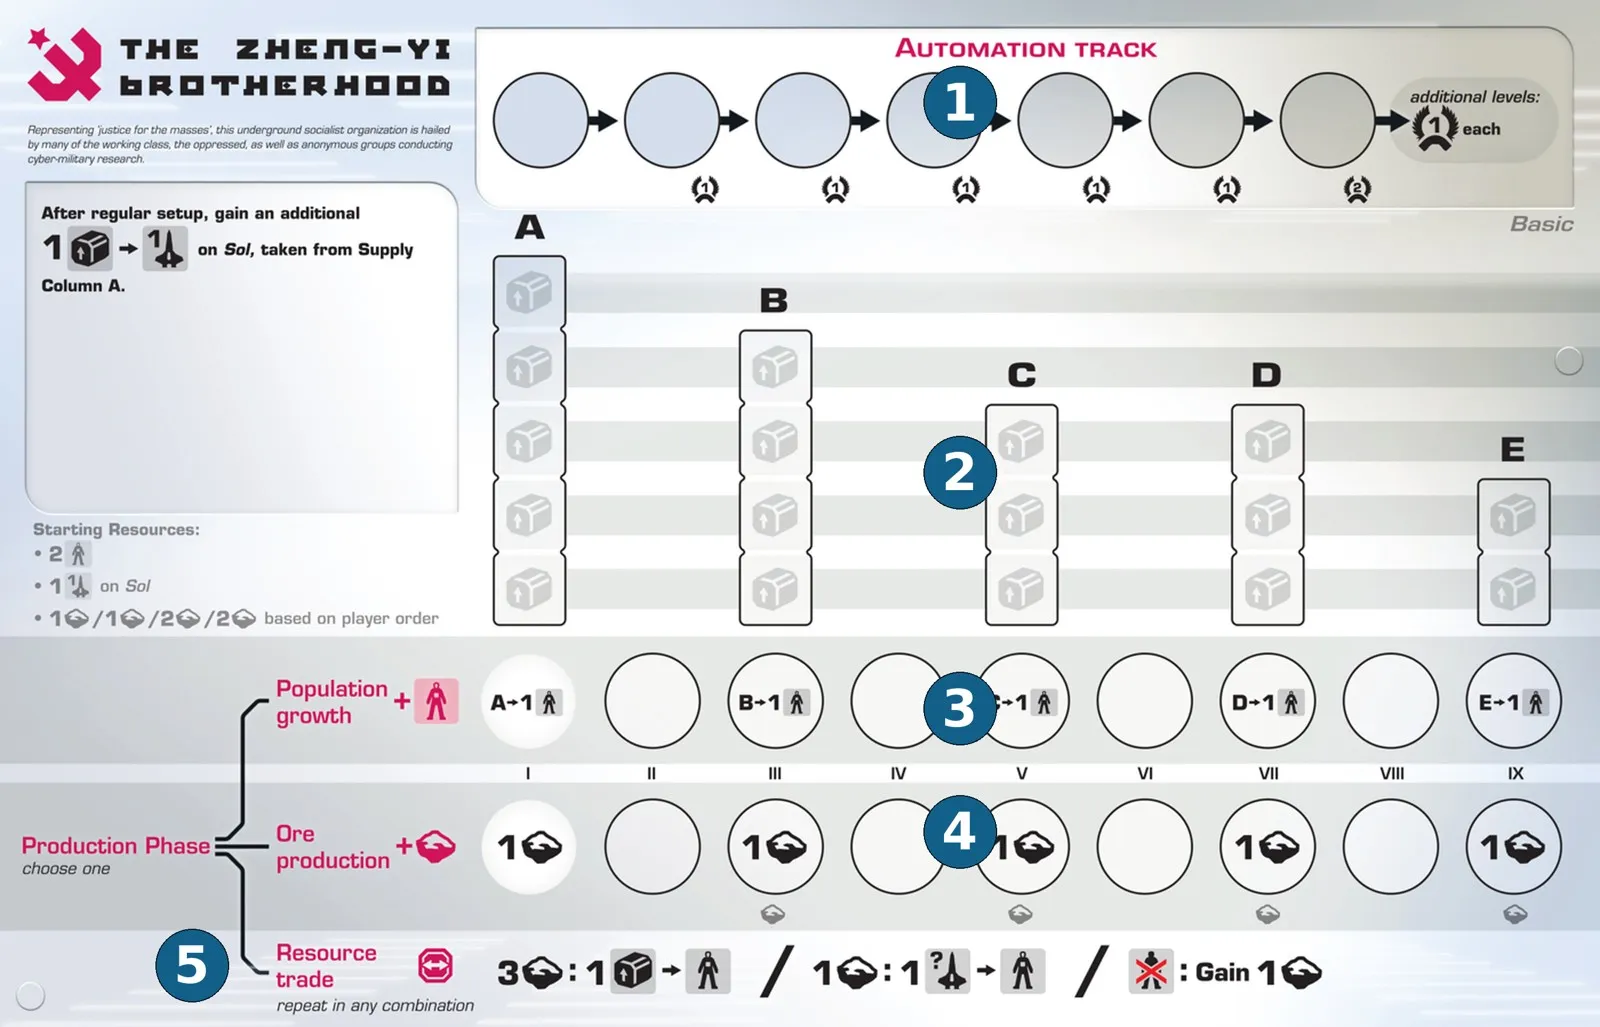
- Automation track — permanent production improvements and scoring.
- Supply Columns — inactive resource cubes.
- Population growth track — which columns can produce Population.
- Ore production track — how much Ore you gain when producing it.
- Trade ratios — exchanges available instead of production.
Action phase
Move your Action pawn to an unoccupied Action space. It must be a space on a Technology you have researched, or a space printed on the board. Your research cube beside a Technology marks your access to its Actions.
- You must move to a different space. A second slot on the same Action or Technology is legal.
- The last Basic Spacefaring Action is the exception: you may repeat its same space.
- Pay the entire cost before resolving the effect. Some Basic Spacefaring spaces charge an additional Ore.
- You cannot choose an Action you cannot perform or afford, or deliberately finish an Action without changing the game state.
- Starting pawns stand off the board and block nothing.
Basic Spacefaring
| Action | Result |
|---|---|
| Research level I | Use 1  Population to research an eligible level I Technology. |
| Research level II | Pay 2  Ore and use 1 Population to research an eligible level II Technology. |
| Build then Jump | Optionally turn 1 Population into a level-1 Spaceship at Sol or a shipyard you control, then spend up to 2 Jumps. |
| Create Population and Ore | Take 1  Supply cube from your leftmost nonempty Supply Column, turn it into Population, and gain 1 Ore. |
Action spaces by player count
The Ore surcharge belongs to a particular slot and adds to the Action’s normal cost.
| Action | 2 players | 3 players | 4 players |
|---|---|---|---|
| Research I | 2 slots, no surcharge | 3 slots, no surcharge | 4 slots, no surcharge |
| Research II | 1 normal slot, 1 slot at +1 Ore | 2 normal slots, 1 slot at +1 Ore | 2 normal slots, 2 slots at +1 Ore |
| Build then Jump | 1 normal slot, 1 slot at +1 Ore | 2 slots, no surcharge | 2 slots, no surcharge |
| Create Population and Ore | Repeatable fallback | Repeatable fallback | Repeatable fallback |
Use the replacement tile for your player count. Research and ships explain the effects in full.
Cubes and Supply
Each of your 20 resource cubes can be Supply, Population or a Spaceship of level 1–4. These are different uses of the same limited set of pieces.
- Population on your mat is available to use. Research commits it permanently beside a Technology; building converts it to a ship.
- Take Supply directly: remove cubes from columns left to right, emptying each before moving to the next. Ignore Food production discs. If Supply runs out, you may substitute Population cubes for missing Supply or skip those missing conversions.
- Return or overwork Population: turn it to Supply and fill empty slots right to left, filling a column before moving left. If every slot is full, extend column A above its printed spaces.
- Returning Population as a cost and using Population in the effect require separate cubes. An Action returning 2 Population and researching with 1 needs 3 available Population.
Production phase
Choose one of the following. This phase is separate from your pawn’s Action. Take the full production possible; you cannot voluntarily reduce it.
Population growth
Read uncovered Population symbols on your growth track, including the initially uncovered leftmost symbol. Each uncovered symbol produces one Population from the Supply Column identified by its letter. Flip that cube from Supply to Population and put it on your mat. An empty column produces nothing, even if other columns still hold cubes.
Removing a Food production disc can expose a symbol. It does not itself produce Population: you must choose growth or resolve a growth effect.
Ore production
Gain one Ore for each uncovered Ore symbol on your Ore production track, including the leftmost symbol. The Ore supply is unlimited; use substitutes if necessary.
Resource trade
Perform any number of these exchanges, in any combination:
| Pay | Receive |
|---|---|
| 3 Ore | 1 Population from your leftmost available Supply cube, ignoring Food discs |
| 1 Ore and decommission any one of your Spaceships | That ship becomes Population on your mat |
| Return 1 Population to Supply, right to left | 1 Ore |
You cannot buy Population from Supply when no Supply cubes remain. Decommissioning a ship can change System control immediately.
Achievement phase
If you qualify for an available Achievement, you must claim one. If several qualify, choose which one; never claim more than one on a turn.
Put an Achievement disc on its leftmost open slot. You may claim each card only once per faction; a full card is closed. The disc remains even if you later lose the qualifying condition. You claim only on your own turn.
Achievement discs used as automation or production placeholders do not count toward the end trigger. Use substitute discs if needed; this supply is unlimited.
Mandatory and optional effects
Costs and effects normally resolve in full. Exceptions are effects labelled optional, may, up to or if possible; unused Jump points; unusable ship upgrades; and missing Supply cubes, for which available Population may optionally substitute.
An Action still must change the game state. An optional build followed by a Jump may be legal without building, but a Jump-only Action cannot deliberately move nothing.